Introduction to TensorFlow
About TensorFlow
TensorFlow™ is an open source software library for numerical computation using data flow graphs. Nodes in the graph represent mathematical operations, while the graph edges represent the multidimensional data arrays (tensors) communicated between them. The flexible architecture allows you to deploy computation to one or more CPUs or GPUs in a desktop, server, or mobile device with a single API. TensorFlow was originally developed by researchers and engineers working on the Google Brain Team within Google's Machine Intelligence research organization for the purposes of conducting machine learning and deep neural networks research, but the system is general enough to be applicable in a wide variety of other domains as well.
We would be learning about using TensorFlow to build interesting applications right from Image classifiers to Speech recognizers. But first, the basics. This webpage consists of demo scripts which would help us to understand how to use TensorFlow for classifying handwritten digits from the MNIST dataset(which is quite known as the "Hello World" program for Deep Learning).
TensorFlowTM MNIST train and predict :
Recognise Handwritten Digits by saving and restoring TensorFlow model
Overview
This project uses the MNIST tutorials from the TensorFlow website. The two tutorials, the beginner tutorial and the expert tutorial, use different deep learning models. The python scripts ending with _1 use the model from the beginner tutorial. The scripts ending with _2 use the model from the advanced tutorial. As expected scripts using the model from the expert tutorial give better results.
This projects consists of four scripts:
- _create_model1.py – creates a model model.ckpt file based on the beginners tutorial.
- create_model_1.py – creates a model model2.ckpt file based on the expert tutorial.
- predict_1.py – uses the model.ckpt (beginners tutorial) file to predict the correct integer form a handwritten number in a .png file.
- predict_2.py – uses the model2.ckpt (expert tutorial) file to predict the correct integer form a handwritten number in a .png file.
Dependencies
The following Python libraries are required.
- sys - should be installed by default
- tensorflow - TensorFlow
- PIL – Pillow
Installing TensorFlow
Of course TensorFlow needs to be installed. The TensorFlow website has a good manual .
Installing Python Image Library (PIL)
The Python Image Library (PIL) is no longer available. Luckily there is a good fork called Pillow. Installing is as easy as:
sudo pip install Pillow
Or look at the Pillow documentation for other installation options.
The python scripts
The easiest way the use the scripts is to put all four scripts in the same folder. If TensorFlow is installed correctly the images to train the model are downloaded automatically.
Running
Running is based on the steps:
- create the model file
- create an image file containing a handwritten number
- predict the integer
1. create the model file
The easiest way is to cd to the directory where the python files are located. Then run:
python create_model_1.py
to create the model based on the MNIST beginners tutorial (model_1).
create_model_1.py
A very simple MNIST classifier.
This script is based on the Tensoflow MNIST beginners tutorial See extensive documentation for the tutorial at https://www.tensorflow.org/get_started/mnist/beginners
#import tensorflow
import tensorflow as tf
from tensorflow.examples.tutorials.mnist import input_data
import os

#import data
mnist_data = input_data.read_data_sets("MNIST_data/", one_hot=True)
ckpt_path = os.path.join(os.getcwd(), "model.ckpt")

# Create the model
x = tf.placeholder(tf.float32, [None, 784])
W = tf.Variable(tf.zeros([784, 10]))
b = tf.Variable(tf.zeros([10]))
y = tf.nn.softmax(tf.matmul(x, W) + b)

# Define loss and optimizer
y_ = tf.placeholder(tf.float32, [None, 10])
cross_entropy = -tf.reduce_sum(y_*tf.log(y))
train_step = tf.train.GradientDescentOptimizer(0.01).minimize(cross_entropy)

init_op = tf.global_variables_initializer()
saver = tf.train.Saver()

# Train the model and save the model to disk as a model.ckpt file
# The model.ckpt is a checkpoint that stores our trained model weights
# and as a result we don't have to train from the beginneing over and over again
# we can just use this checkpoint and progress from there with our training
# It is stored in the same directory as this python script is started

"""
The use of 'with tf.Session() as sess:' is taken from the Tensor flow documentation
on saving and restoring variables.
https://www.tensorflow.org/get_started/get_started
"""

with tf.Session() as sess:
    sess.run(init_op)
    for i in range(1000):
        batch_xs, batch_ys = mnist_data.train.next_batch(100)
        sess.run(train_step, feed_dict={x: batch_xs, y_: batch_ys})

    save_path = saver.save(sess, ckpt_path)
    print ("Model saved in file: ", save_path)
This is a simple model which won't give substantially accurate results We can run:
python create_model_2.py
to create the model based on the expert tutorial (model_2).
create_model_2.py
A slightly complex MNIST classifier.
This script is based on the Tensoflow MNIST expert tutorial See extensive documentation for the tutorial at https://www.tensorflow.org/get_started/mnist/pros
#import tensorflow
import tensorflow as tf
from tensorflow.examples.tutorials.mnist import input_data

#import data
mnist = input_data.read_data_sets("MNIST_data/", one_hot=True)

sess = tf.InteractiveSession()

# Create the model
x = tf.placeholder(tf.float32, [None, 784])
y_ = tf.placeholder(tf.float32, [None, 10])
W = tf.Variable(tf.zeros([784, 10]))
b = tf.Variable(tf.zeros([10]))
y = tf.nn.softmax(tf.matmul(x, W) + b)

# Weight variables
def weight_variable(shape):
  initial = tf.truncated_normal(shape, stddev=0.1)
  return tf.Variable(initial)

# Bias variables
def bias_variable(shape):
  initial = tf.constant(0.1, shape=shape)
  return tf.Variable(initial)

# Convloutional layer
# Definitely learn more at : https://www.tensorflow.org/get_started/mnist/pros
def conv2d(x, W):
  return tf.nn.conv2d(x, W, strides=[1, 1, 1, 1], padding='SAME')

# Max-pooling layer
def max_pool_2x2(x):
  return tf.nn.max_pool(x, ksize=[1, 2, 2, 1],
                        strides=[1, 2, 2, 1], padding='SAME')

# Defining our Convolutional Neural Network architecture:
W_conv1 = weight_variable([5, 5, 1, 32])
b_conv1 = bias_variable([32])

x_image = tf.reshape(x, [-1,28,28,1])
h_conv1 = tf.nn.relu(conv2d(x_image, W_conv1) + b_conv1)
h_pool1 = max_pool_2x2(h_conv1)

W_conv2 = weight_variable([5, 5, 32, 64])
b_conv2 = bias_variable([64])

h_conv2 = tf.nn.relu(conv2d(h_pool1, W_conv2) + b_conv2)
h_pool2 = max_pool_2x2(h_conv2)

W_fc1 = weight_variable([7 * 7 * 64, 1024])
b_fc1 = bias_variable([1024])

h_pool2_flat = tf.reshape(h_pool2, [-1, 7*7*64])
h_fc1 = tf.nn.relu(tf.matmul(h_pool2_flat, W_fc1) + b_fc1)

keep_prob = tf.placeholder(tf.float32)
h_fc1_drop = tf.nn.dropout(h_fc1, keep_prob)

W_fc2 = weight_variable([1024, 10])
b_fc2 = bias_variable([10])

y_conv=tf.nn.softmax(tf.matmul(h_fc1_drop, W_fc2) + b_fc2)

# Define loss and optimizer
cross_entropy = -tf.reduce_sum(y_*tf.log(y_conv))
train_step = tf.train.AdamOptimizer(1e-4).minimize(cross_entropy)
correct_prediction = tf.equal(tf.argmax(y_conv,1), tf.argmax(y_,1))
accuracy = tf.reduce_mean(tf.cast(correct_prediction, tf.float32))

"""
Train the model and save the model to disk as a model2.ckpt file.
It is stored in the same directory as this python script is started.

Based on the documentation at
https://www.tensorflow.org/get_started/get_started
"""

saver = tf.train.Saver()
init_ops = tf.global_variables_initializer()
sess.run(init_ops)

# You can increase the range as per your CPU power and the accuracy obtained.
# More the iterations, higer is the final accuracy.
for i in range(2000):
  batch = mnist.train.next_batch(50)
  if i%100 == 0:
    train_accuracy = accuracy.eval(feed_dict={
        x:batch[0], y_: batch[1], keep_prob: 1.0})
    print("step %d, training accuracy %g"%(i, train_accuracy))
  train_step.run(feed_dict={x: batch[0], y_: batch[1], keep_prob: 0.5})

save_path = saver.save(sess, os.path.join(os.getcwd(), "model2.ckpt"))
print ("Model saved in file: ", save_path)

print("test accuracy %g"%accuracy.eval(feed_dict={
    x: mnist.test.images, y_: mnist.test.labels, keep_prob: 1.0}))
Now that our training is done and we have our trained models
model.ckpt and model2.ckptsaved, we can use them to predict our own handwriting samples of digits.
2. Create an image file
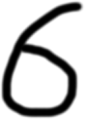
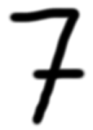
You have to create a PNG file that contains a handwritten number. The background has to be white and the number has to be black. Any paint program should be able to do this. Also the image has to be auto cropped so that there is no border around the number.
Here are a few examples:


3. Predict the integer
The easiest way again is to put the image file from the previous step (step 2) in the same directory as the python scripts and cd to the directory where the python files are located.
The predict scripts require one argument: the file location of the image file containing the handwritten number. For example when the image file is ‘number1.png’ and is in the same location as the script, run:
python predict_1.py ‘number1.png’
predict_1.py
Predict a handwritten integer (MNIST beginners).
Script requires
- saved model (model.ckpt file) in the same location as the script is run from.
- one argument (png file location of a handwritten integer)
#import modules
import sys
import tensorflow as tf
from PIL import Image,ImageFilter

def predict_int(imvalue):
    """
    This function returns the predicted integer.
    The input is the pixel values from the prepare_image() function.
    """

    # Define the model (same as when creating the model file)
    x = tf.placeholder(tf.float32, [None, 784])
    W = tf.Variable(tf.zeros([784, 10]))
    b = tf.Variable(tf.zeros([10]))
    y = tf.nn.softmax(tf.matmul(x, W) + b)

    init_op = tf.global_variables_initializer()
    saver = tf.train.Saver()

    """
    Load the model.ckpt file
    file is stored in the same directory as this python script is started
    Use the model to predict the integer. Integer is returend as list.

    Based on the documentation at
    https://www.tensorflow.org/get_started/get_started
    """
    with tf.Session() as sess:
        sess.run(init_op)
        print(ckpt_path)
        saver.restore(sess, ckpt_path)
        print ("Model restored.")

        prediction=tf.argmax(y,1)
        return prediction.eval(feed_dict={x: [imvalue]}, session=sess)


def prepare_image(argv):
    """
    This function returns the pixel values.
    The imput is a png file location.
    """
    im = Image.open(argv).convert('L')
    width = float(im.size[0])
    height = float(im.size[1])
    newImage = Image.new('L', (28, 28), (255)) #creates white canvas of 28x28 pixels

    if width > height: #check which dimension is bigger
        #Width is bigger. Width becomes 20 pixels.
        nheight = int(round((20.0/width*height),0)) #resize height according to ratio width
        if (nheigth == 0): #rare case but minimum is 1 pixel
            nheigth = 1
        # resize and sharpen
        img = im.resize((20,nheight), Image.ANTIALIAS).filter(ImageFilter.SHARPEN)
        wtop = int(round(((28 - nheight)/2),0)) #caculate horizontal pozition
        newImage.paste(img, (4, wtop)) #paste resized image on white canvas
    else:
        #Height is bigger. Heigth becomes 20 pixels.
        nwidth = int(round((20.0/height*width),0)) #resize width according to ratio height
        if (nwidth == 0): #rare case but minimum is 1 pixel
            nwidth = 1
         # resize and sharpen
        img = im.resize((nwidth,20), Image.ANTIALIAS).filter(ImageFilter.SHARPEN)
        wleft = int(round(((28 - nwidth)/2),0)) #caculate vertical pozition
        newImage.paste(img, (wleft, 4)) #paste resized image on white canvas

    #newImage.save("sample.png")

    tv = list(newImage.getdata()) #get pixel values

    #normalize pixels to 0 and 1. 0 is pure white, 1 is pure black.
    tva = [ (255-x)*1.0/255.0 for x in tv]
    return tva
    #print(tva)

# Main function:
imvalue = prepare_image('number1.png')
predint = predict_int(imvalue)
print ("Predicted number is : " + str(predint[0])) #first value in list that reresnts the prediction with highest probability
Predicted number is 1
is the output.
or we can run :
python predict_2.py ‘number1.png’
The first script, predict_1.py, uses the model.ckpt file created by the create_model_1.py script. The second script, predict_2.py, uses the model2.ckpt file created by the create_model_2.py script.
predict_2.py
Predict a handwritten integer (MNIST beginners).
Script requires
- saved model (model2.ckpt file) in the same location as the script is run from.
- one argument (png file location of a handwritten integer)
#import modules
import sys
import tensorflow as tf
from PIL import Image,ImageFilter

ckpt_path = os.path.join(os.getcwd(), "model.ckpt")

def predict_int(imvalue):
    """
    This function returns the predicted integer.
    The input is the pixel values from the prepare_image() function.
    """

    # Define the model (same as when creating the model file)
    x = tf.placeholder(tf.float32, [None, 784])
    W = tf.Variable(tf.zeros([784, 10]))
    b = tf.Variable(tf.zeros([10]))
    y = tf.nn.softmax(tf.matmul(x, W) + b)

    init_op = tf.global_variables_initializer()
    saver = tf.train.Saver()

    """
    Load the model2.ckpt file
    file is stored in the same directory as this python script is started
    Use the model to predict the integer. Integer is returend as list.

    Based on the documentation at
    https://www.tensorflow.org/get_started/get_started
    """
    with tf.Session() as sess:
        sess.run(init_op)
        saver.restore(sess, ckpt_path)
        print ("Model restored.")

        prediction=tf.argmax(y,1)
        return prediction.eval(feed_dict={x: [imvalue]}, session=sess)


def prepare_image(argv):
    """
    This function returns the pixel values.
    The imput is a png file location.
    """
    im = Image.open(argv).convert('L')
    width = float(im.size[0])
    height = float(im.size[1])
    newImage = Image.new('L', (28, 28), (255)) #creates white canvas of 28x28 pixels

    if width > height: #check which dimension is bigger
        #Width is bigger. Width becomes 20 pixels.
        nheight = int(round((20.0/width*height),0)) #resize height according to ratio width
        if (nheigth == 0): #rare case but minimum is 1 pixel
            nheigth = 1
        # resize and sharpen
        img = im.resize((20,nheight), Image.ANTIALIAS).filter(ImageFilter.SHARPEN)
        wtop = int(round(((28 - nheight)/2),0)) #caculate horizontal pozition
        newImage.paste(img, (4, wtop)) #paste resized image on white canvas
    else:
        #Height is bigger. Heigth becomes 20 pixels.
        nwidth = int(round((20.0/height*width),0)) #resize width according to ratio height
        if (nwidth == 0): #rare case but minimum is 1 pixel
            nwidth = 1
         # resize and sharpen
        img = im.resize((nwidth,20), Image.ANTIALIAS).filter(ImageFilter.SHARPEN)
        wleft = int(round(((28 - nwidth)/2),0)) #caculate vertical pozition
        newImage.paste(img, (wleft, 4)) #paste resized image on white canvas

    #newImage.save("sample.png")

    tv = list(newImage.getdata()) #get pixel values

    #normalize pixels to 0 and 1. 0 is pure white, 1 is pure black.
    tva = [ (255-x)*1.0/255.0 for x in tv]
    return tva
    #print(tva)

# Main function:
imvalue = prepare_image('number4.png')
predint = predict_int(imvalue)
print ("Predicted number is : " + str(predint[0])) #first value in list that reresnts the prediction with highest probability
Predicted number is 4
is the output of this script
You can download the entire code from here.
Thus we have studied how to train one simple and one slightly complex model on the MNIST dataset using tensorflow and then we used scripts to predict our own handwritten digits samples by restoring our saved TensorFlow model. As you might have noticed, TensorFlow can be quite powerful when it comes to building Deep Learning applications. Thanks to Google for open sourcing it for us so that we can leverage it's capabilities to build some really awesome projects. Stay tuned for more!