OpenCV : Basics
OpenCV (Open Source Computer Vision) is an image and video processing library of programming functions mainly aimed at real-time computer vision. OpenCV has bindings in C++, C, Python, Java and MATLAB/OCTAVE.
Applications of OpenCV include variety of image and video analysis techniques like :
- Egomotion
- Facial recognition system
- Gesture recognition
- Human–computer interaction (HCI)
- Mobile robotics
- Object Recognition
- Image Segmentation and recognition
- Stereopsis stereo vision: depth perception from 2 cameras
- Structure from motion (SFM)
- Motion tracking
- Augmented reality
- Optical Character Recognition
and lots of others.
In the next set of examples, we will primarily be working on Python. Installing OpenCV for python requires two main libraries, with an optional third. Below Python packages are to be downloaded and installed to their default locations.
- Python-2.7.x.
- Numpy.
- Matplotlib (Matplotlib is optional, but recommended since we use it a lot in our tutorials).
Windows Users:
Download the appropriate wheel (.whl) file of opencv for your corresponding operating system from https://www.lfd.uci.edu/~gohlke/pythonlibs/#opencv
Then open Command Prompt and direct to the Scripts folder and install the modules using pip:
C:/Python34/Scripts
pip install _youropencvwhlfile_.whl
pip install numpy
pip install matplotlib
If this method doesn't work, here's an alternative :
- Download latest OpenCV release from here and double-click to extract it.
- Goto opencv/build/python/2.7 folder.
- Copy cv2.pyd to C:/Python27/lib/site-packages.
- Open Python IDLE and type following codes in Python terminal.
import cv2
print cv2.__version__
If the results are printed out without any errors then you have successfully installed OpenCV-Python.
Linux / Mac Users:
pip3 install numpyorapt-get install python3-numpy.
You may need to apt-get install python3-pip.
pip3 install matplotliborapt-get install python3-matplotlib.
apt-get install python-OpenCV.
Matplotlib is an optional choice for visualizing video or image frames . Numpy will be primarily used for its array functionality. Finally, we will be using the python-specific bindings for OpenCV called python-OpenCV.
Here's an alternative solution to build and install OpenCV in Ubuntu.
Once installed, Run the following python module imports:
import cv2
import matplotlib
import numpy
If there are no errors then we are good to go!
Getting started with images
Reading an image:
Use the function cv2.imread() to read an image. The image should be in the working directory or a full path of image should be given. I highly encourage you to use your own images as examples to increase fun as well as the learning curve.
Second argument is a flag which specifies the way image should be read.
cv2.IMREAD_COLOR : Loads a color image. Any transparency of image will be neglected. It is the default flag. cv2.IMREAD_GRAYSCALE : Loads image in grayscale mode cv2.IMREAD_UNCHANGED : Loads image as such including alpha channel
import numpy as np
import cv2
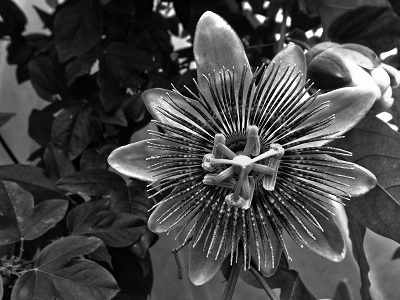
# Load an color image in grayscale
img = cv2.imread('images/flower.jpg',0)
# Warning: Even if the image path is wrong, it won’t throw any error, but print img will give you None
Displaying an image:
Use the function cv2.imshow() to display an image in a window. The window automatically fits to the image size. First argument is a window name which is a string. second argument is our image.
cv2.imshow('image',img)
cv2.waitKey(0)
cv2.destroyAllWindows()
A GUI will open as a result and would look like:
cv2.waitKey() is a keyboard binding function. Its argument is the time in milliseconds. The function waits for specified milliseconds for any keyboard event. If you press any key in that time, the program continues. If 0 is passed, it waits indefinitely for a key stroke. It can also be set to detect specific key strokes like, if key a is pressed etc which we will discuss below.
cv2.destroyAllWindows() simply destroys all the windows we created. If you want to destroy any specific window, use the function cv2.destroyWindow() where you pass the exact window name as the argument.
Note: There is a special case where you can already create a window and load image to it later. In that case, you can specify whether window is resizable or not. It is done with the function cv2.namedWindow(). By default, the flag is cv2.WINDOW_AUTOSIZE. But if you specify flag to be cv2.WINDOW_NORMAL, you can resize window. It will be helpful when image is too large in dimension and adding track bar to windows.
This can be done using:
cv2.namedWindow('image', cv2.WINDOW_NORMAL)
cv2.imshow('image',img)
cv2.waitKey(0)
cv2.destroyAllWindows()
Write an image
Use the function cv2.imwrite() to save an image. First argument is the file name, second argument is the image you want to save.
cv2.imwrite('flowergray.png',img)
# This will save the image in PNG format in the working directory.
Getting started with Videos
OpenCV provides a very simple interface to capture live stream with our own cameras.
To capture a video, you need to create a VideoCapture object. Its argument can be either the device index or the name of a video file. Device index is just the number to specify which camera. If there are multiple cameras connected to your computer passing index as 0 or -1 would start the first camera; passing 1 as index would start the second camera and so on.
After starting the respective camera, you can capture frame-by-frame. And at the end of capturing, we release the capture.
import numpy as np
import cv2
cap = cv2.VideoCapture(0)
while(True):
    # Capture frame-by-frame
    ret, frame = cap.read()
    # Our operations on the frame come here
    gray = cv2.cvtColor(frame, cv2.COLOR_BGR2GRAY)
    # Display the resulting frame
    cv2.imshow('frame',gray)
    if cv2.waitKey(1) & 0xFF == ord('q'):
        break
# When everything done, release the capture
cap.release()
cv2.destroyAllWindows()
This will capture a video from the camera (in this case the in-built webcam of my laptop), convert it into grayscale video and display it.
cap.read() returns a bool (True/False). If frame is read correctly, it will be True. So you can check end of the video by checking this return value. Sometimes, cap may not have initialized the capture. In that case, this code shows error. You can check whether it is initialized or not by the method cap.isOpened(). If it is True, OK. Otherwise open it using cap.open().
Playing Video from file
It is same as capturing from Camera, just change camera index with video file name. Also while displaying the frame, use appropriate time for cv2.waitKey(). If it is too less, video will be very fast and if it is too high, video will be slow (Well, that is how you can display videos in slow motion). 25 milliseconds will be OK in normal cases
import numpy as np
import cv2
cap = cv2.VideoCapture('videos/people-walking.mp4')
while(cap.isOpened()):
    ret, frame = cap.read()
    gray = cv2.cvtColor(frame, cv2.COLOR_BGR2GRAY)
    cv2.imshow('frame',gray)
    if cv2.waitKey(1) & 0xFF == ord('q'):
        break
cap.release()
cv2.destroyAllWindows()
Saving a Video
What if we want to save the video after we capture it and process it frame-by-frame? For images, it is very simple, just use cv2.imwrite().
This time we create a VideoWriter object. We should specify the output file name (eg: output.avi). Then we should specify the FourCC code . Then number of frames per second (fps) and frame size should be passed. And last one is isColor flag. If it is True, encoder expect color frame, otherwise it works with grayscale frame.
FourCC is a 4-byte code used to specify the video codec. The list of available codes can be found in fourcc.org. It is platform dependent.
FourCC code is passed as cv2.VideoWriter_fourcc(’M’,’J’,’P’,’G’) or cv2.VideoWriter_fourcc(*’MJPG) for MJPG.
Below code captures from a Camera, flip every frame in vertical direction and saves it.
import numpy as np
import cv2
cap = cv2.VideoCapture(0)
# Define the codec and create VideoWriter object
fourcc = cv2.VideoWriter_fourcc(*'XVID')
out = cv2.VideoWriter('output.avi',fourcc, 20.0, (640,480))
while(cap.isOpened()):
    ret, frame = cap.read()
    if ret==True:
        frame = cv2.flip(frame,0)
        # write the flipped frame
        out.write(frame)
        cv2.imshow('frame',frame)
        if cv2.waitKey(1) & 0xFF == ord('q'):
            break
    else:
        break
# Release everything if job is finished
cap.release()
out.release()
cv2.destroyAllWindows()
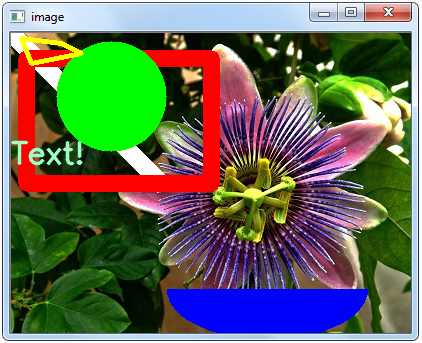
Drawing and Writing Text on Images
To draw different shapes using OpenCV we would be using functions like: _cv2.line(), cv2.circle() , cv2.rectangle(), cv2.ellipse() etc
In all the above functions, you will see some common arguments as given below:
- img : The image where you want to draw the shapes
- color : Color of the shape. for BGR, pass it as a tuple, eg: (255,0,0) for blue. For grayscale, just pass the scalar value.
- thickness : Thickness of the line or circle etc. If -1 is passed for closed figures like circles, it will fill the shape. default thickness = 1
- lineType : Type of line, whether 8-connected, anti-aliased line etc. By default, it is 8-connected. cv2.LINE_AA gives anti-aliased line which looks great for curves.
To add text to images you need to specify following things:
- Text data that you want to write
- Position coordinates of where you want put it (i.e. bottom-left corner where data starts).
- Font type (Check cv2.putText() docs for supported fonts)
- Font Scale (specifies the size of font)
- regular things like color, thickness, lineType etc. For better look, lineType = cv2.LINE_AA is recommended.
import numpy as np
import cv2

img = cv2.imread('images/flower.jpg',cv2.IMREAD_COLOR)

cv2.line(img,(0,0),(150,150),(255,255,255),15)  # line
# To draw a line, you need to pass starting and ending coordinates of line.

cv2.rectangle(img,(15,25),(200,150),(0,0,255),15)  # red rect
# To draw a rectangle, you need top-left corner and bottom-right corner of rectangle.

cv2.circle(img,(100,63), 55, (0,255,0), -1)  #circle
# To draw a circle, you need its center coordinates and radius.

cv2.ellipse(img,(256,256),(100,50),0,0,180,255,-1) #elipse
# To draw the ellipse, we need to pass follwing arguments : 1.center location (x,y); 2.axes lengths (major axis length, minor axis length).
# then the angle of rotation of ellipse in anti-clockwise direction.
# startAngle and endAngle denotes the starting and ending of ellipse arc measured in clockwise direction from major axis.
# i.e. giving values 0 and 360 gives the full ellipse

pts = np.array([[10,5],[20,30],[70,20],[50,10]], np.int32) # polygon
# To draw a polygon, first you need coordinates of vertices. Make those points into an array of shape ROWSx1x2 where
# ROWS are number of vertices and it should be of type int32.
pts = pts.reshape((-1,1,2))
cv2.polylines(img, [pts], True, (0,255,255), 3)

# writing
font = cv2.FONT_HERSHEY_SIMPLEX
cv2.putText(img,'Text!',(0,130), font, 1, (200,255,155), 2, cv2.LINE_AA)

cv2.imshow('image',img)
cv2.waitKey(0)
cv2.destroyAllWindows()
The output would be :
Using Mouse as a Paint Brush:
Here, we create a simple application which draws a circle on an image wherever we double-click on it.
First we create a mouse callback function which is executed when a mouse event take place. Mouse event can be anything related to mouse like left-button down, left-button up, left-button double-click etc. It gives us the coordinates (x,y) for every mouse event. With this event and location, we can do whatever we like. To list all available events available, run the following code in Python terminal:
import cv2
events = [i for i in dir(cv2) if 'EVENT' in i]
print events
Creating mouse callback function has a specific format which is same everywhere. It differs only in what the function does. So our mouse callback function does one thing, it draws a circle where we double-click.
import cv2
import numpy as np
# mouse callback function
def draw_circle(event,x,y,flags,param):
    if event == cv2.EVENT_LBUTTONDBLCLK:
        cv2.circle(img,(x,y),100,(255,0,0),-1)

# Create a black image, a window and bind the function to window
img = np.zeros((512,512,3), np.uint8)
cv2.namedWindow('image')
cv2.setMouseCallback('image',draw_circle)

while(1):
    cv2.imshow('image',img)
    if cv2.waitKey(20) & 0xFF == 27:
        break
cv2.destroyAllWindows()
Now we go for much more better application. In this, we draw either rectangles or circles (depending on the mode we select) by dragging the mouse like we do in Paint application. So our mouse callback function has two parts, one to draw rectangle and other to draw the circles. This specific example will be really helpful in creating and understanding some interactive applications like object tracking, image segmentation etc.
import cv2
import numpy as np
drawing = False # true if mouse is pressed
mode = True # if True, draw rectangle. Press 'm' to toggle to curve
ix,iy = -1,-1
# mouse callback function
def draw_circle(event,x,y,flags,param):
    global ix,iy,drawing,mode
    if event == cv2.EVENT_LBUTTONDOWN:
        drawing = True
        ix,iy = x,y
    elif event == cv2.EVENT_MOUSEMOVE:
        if drawing == True:
            if mode == True:
                cv2.rectangle(img,(ix,iy),(x,y),(0,255,0),-1)
            else:
                cv2.circle(img,(x,y),5,(0,0,255),-1)
    elif event == cv2.EVENT_LBUTTONUP:
        drawing = False
        if mode == True:
            cv2.rectangle(img,(ix,iy),(x,y),(0,255,0),-1)
        else:
            cv2.circle(img,(x,y),5,(0,0,255),-1)
# Next we have to bind this mouse callback function to OpenCV window. In the main loop, we should set a keyboard binding for key ‘m’ to toggle between rectangle and circle.

img = np.zeros((512,512,3), np.uint8)
cv2.namedWindow('image')
cv2.setMouseCallback('image',draw_circle)
while(1):
    cv2.imshow('image',img)
    k = cv2.waitKey(1) & 0xFF
    if k == ord('m'):
        mode = not mode
    elif k == 27:
        break
cv2.destroyAllWindows()
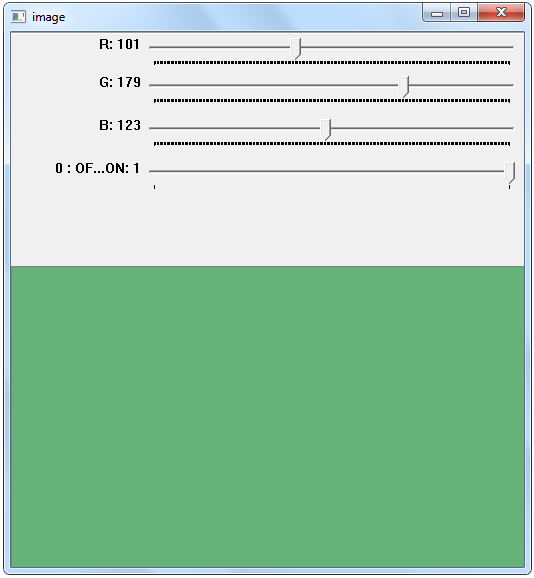
Trackbar as the Color Palette
Here we will create a simple application which shows the color you specify. You have a window which shows the color and three trackbars to specify each of B,G,R colors. You slide the trackbar and correspondingly window color changes. By default, initial color will be set to Black.
For cv2.getTrackbarPos() function, first argument is the trackbar name, second one is the window name to which it is attached, third argument is the default value, fourth one is the maximum value and fifth one is the callback function which is executed everytime trackbar value changes. The callback function always has a default argument which is the trackbar position. In our case, function does nothing, so we simply pass.
Another important application of trackbar is to use it as a button or switch. OpenCV, by default, doesn’t have button functionality. So you can use trackbar to get such functionality. In our application, we have created one switch in which application works only if switch is ON, otherwise screen is always black.
import cv2
import numpy as np

def nothing(x):
    pass

# Create a black image, a window
img = np.zeros((300,512,3), np.uint8)
cv2.namedWindow('image')

# create trackbars for color change
cv2.createTrackbar('R','image',0,255,nothing)
cv2.createTrackbar('G','image',0,255,nothing)
cv2.createTrackbar('B','image',0,255,nothing)

# create switch for ON/OFF functionality
switch = '0 : OFF \n1 : ON'
cv2.createTrackbar(switch, 'image',0,1,nothing)

while(1):
    cv2.imshow('image',img)
    k = cv2.waitKey(1) & 0xFF
    if k == 27:
        break
    # get current positions of four trackbars
    r = cv2.getTrackbarPos('R','image')
    g = cv2.getTrackbarPos('G','image')
    b = cv2.getTrackbarPos('B','image')
    s = cv2.getTrackbarPos(switch,'image')

    if s == 0:
        img[:] = 0
    else:
        img[:] = [b,g,r]

cv2.destroyAllWindows()
Our application would look something like this: